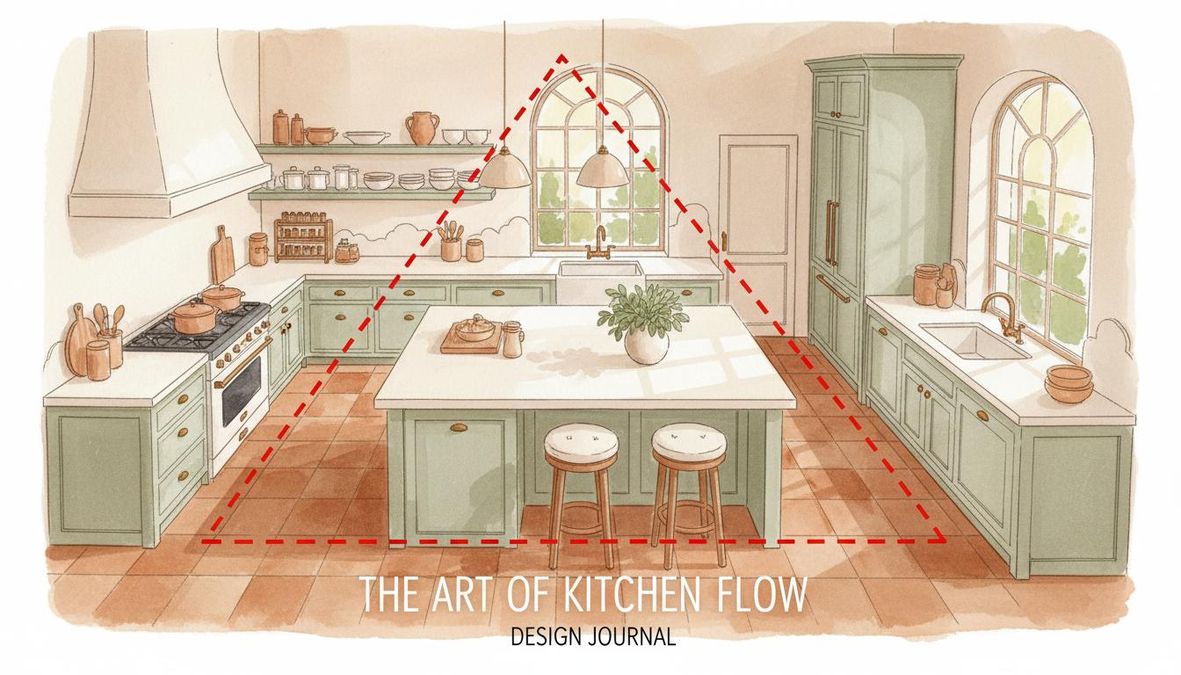
An island can make a kitchen. It can also wreck one. I’ve walked into kitchens where the island is the best thing in the room — extra prep space, a place for the kids to eat breakfast, storage for pots you actually use. I’ve also walked into kitchens where the island turned a workable room into a maze. The difference is almost always planning, not budget.
If you’re thinking about a kitchen design with an island, this guide covers what actually matters: how much room you need, which layout fits your space, and the mistakes that turn an island into a $5,000 regret. For cost specifics, check our full breakdown on kitchen island cost.
When an Island Belongs in Your Kitchen
Here’s the simplest rule I know: if your kitchen is under 120 square feet, an island is probably the wrong call. At that size, a peninsula or rolling cart gives you most of the function without eating your walkway. You can find more ideas for tight spaces in our guide to small kitchen island ideas.
The minimum comfortable size for an island kitchen is about 150 square feet. That’s roughly a 10-by-15-foot room. Below that, you run into a math problem. A functional island needs at least 24 by 48 inches if it’s just for prep. Add seating and you’re looking at 36 by 72 inches minimum. Then you need 36 to 48 inches of clearance on every side so two people can pass each other. Add cabinets along the walls and suddenly you’re out of room.
If your kitchen is between 120 and 150 square feet, you might squeeze in a narrow island — think 24 inches wide, 60 inches long — but only if your wall cabinets are shallow or you sacrifice upper storage. It’s a tradeoff that works for some households and frustrates others.
The kitchens where islands shine are 180 to 250 square feet. That’s your typical suburban open-concept kitchen. You have enough room for a proper island with seating, full clearance, and wall cabinets that actually hold things.
Over 300 square feet? You can start thinking about a double island or an island large enough to host a full Thanksgiving prep crew. But most people don’t have that much space, and most people don’t need it.
The Work Triangle Rule and How an Island Fits Into It
The work triangle is an old idea — it dates back to the 1940s — but it’s still useful because it describes something real. You have three main work centers: the sink, the range, and the refrigerator. The triangle connects them. The total perimeter should fall between 13 and 26 feet. Each leg should be 4 to 9 feet.
What does that mean in practice? It means you shouldn’t have to hike across the kitchen every time you move a pot from the stove to the sink. But it also means the three points shouldn’t be so close together that you’re tripping over yourself.
An island becomes a problem when it breaks this triangle. I’ve seen kitchens where the island sits directly between the fridge and the stove. You open the fridge, grab the chicken, then walk around the island to get to the range. Every single meal prep involves that extra loop. It gets old fast.
The fix is simple in theory: place the island parallel to your main work wall, with enough clearance that the triangle stays intact. If your sink is on the island, the fridge and range should form the other two points on the perimeter. If your cooktop is on the island, you need a venting plan — more on that in a moment.
The key question to ask yourself: does the island make my three main work points easier to reach, or does it add steps? If it adds steps, your layout needs work.
Seven Kitchen-With-Island Layouts That Actually Work
L-Shape With Island
This is the most common island layout in America, and for good reason. The L-shape uses two adjacent walls, leaving the rest of the room open. The island sits in that open space, facing the main work wall. It’s the default choice for open-concept homes because the island creates a natural boundary between kitchen and living area without putting up a wall.
An L-shape with island works in kitchens from about 150 square feet up. The island usually faces the long leg of the L. If you put the sink in the island, you can look out into the living room while you wash dishes — a feature a lot of people love. If you keep the sink on the wall, the island becomes pure prep and seating space.
The main risk with this layout is making the island too deep. A 48-inch-deep island sounds generous until you realize you can’t reach the middle from either side. Keep it at 36 to 42 inches deep for a single-sided island.
U-Shape With Island
A U-shape with an island is a big-kitchen layout. You have cabinets on three walls and an island in the center. This gives you enormous storage — probably more than most households need — and a massive amount of counter space.
The catch is clearance. With cabinets on three walls and an island in the middle, your walkways get tight fast. You need at least 48 inches between the island and each leg of the U, which means your room needs to be at least 13 feet wide. In a 12-foot-wide kitchen, a U-shape with island feels claustrophobic.
This layout works best when you have two cooks who want separate zones. One person works the main wall, the other claims the island. You stay out of each other’s way.
Galley With Narrow Island
A galley kitchen is two parallel walls with a walkway between them. Adding an island sounds impossible, and sometimes it is. But in a long, narrow galley — say, 10 feet wide and 16 feet long — a narrow island running down the middle can work.
The island here is thin: 24 to 30 inches wide, the same depth as your base cabinets. You get extra prep space and maybe a stool or two on one end. What you don’t get is a big social hub. This island is functional, not festive.
The critical measurement is the aisle width. With a 24-inch island, you need at least 36 inches on each side. That means your room needs to be 8 feet from wall to wall after accounting for cabinet depth. In older homes with true galley kitchens (7 feet or less between walls), skip the island and go with a rolling cart you can move when you need the floor space.
Open-Concept With Island
In a fully open-concept home — kitchen, dining, and living room in one big space — the island often becomes the only architectural element that says “this is the kitchen.” It defines the zone. It faces the living room. It’s where guests gather while you cook.
This layout demands a larger island because it’s doing more work. You’re looking at 8 to 10 feet long, with seating on one or two sides. Many people add a second prep sink or a beverage fridge. The island becomes a mini kitchen within the kitchen.
The downside? Noise and smells travel. There’s no wall to contain the cooking sounds or the smell of last night’s fish. An overhead vent hood helps, but it won’t solve everything. If you’re a messy cook, your guests see everything.
Double-Island
A double-island kitchen is a luxury layout for homes with 300 square feet or more. You typically have one island dedicated to prep — sink, dishwasher, maybe a cooktop — and a second island for seating, baking, or serving. In some layouts, one island is a working surface and the other is a dining-height table.
This is not a layout you force into a space that doesn’t want it. Two islands need room to breathe. You want at least 48 inches between them, and 60 is better. If your kitchen isn’t big enough for that gap, one good island beats two cramped ones every time.
Peninsula-Instead-of-Island
Sometimes you want the function of an island but you don’t have clearance on all four sides. Maybe one side of your kitchen opens to a hallway. Maybe a structural column sits where the island would go. A peninsula — essentially an island connected to a wall or cabinet run — solves this.
A peninsula gives you the extra counter and seating without requiring circulation on all sides. You lose the 360-degree access, but in a lot of kitchens, that access was never going to happen anyway. L-shaped and U-shaped kitchens often gain a peninsula on the open end.
The one thing to watch: a peninsula can create a pinch point at the corner where it meets the main cabinets. Make sure that junction point has at least 36 inches of clear walkway.
Island With Attached Table
This hybrid layout connects the island to a lower table surface, usually at dining height (30 inches) while the island stays at counter height (36 inches). It’s popular in multi-generational homes because kids can do homework at the table while adults prep dinner at the island.
The table section is often wood or a contrasting material, which gives the kitchen visual warmth. Functionally, it’s a compromise: you get some of the island’s prep space and some of a dining table’s comfort, but the table doesn’t offer the same storage or utility as a full island extension.
This layout needs length. A combined island-table setup runs 10 to 14 feet, which only works in larger kitchens.
The Five Most Common Island Design Mistakes
Too Big for the Room
This is the mistake I see most often. Someone falls in love with a 10-foot island they saw on Pinterest and squeezes it into a 12-foot-wide kitchen. The result is 24-inch aisles on both sides. You can’t open the dishwasher and the oven at the same time. Two people can’t pass each other. The island that was supposed to improve the kitchen turned it into an obstacle course.
Measure your room before you fall in love with an island size. Draw it out with tape on the floor if you have to. Walk the paths you’ll take every day. If you find yourself turning sideways to get past, the island is too big.
Blocking the Work Triangle
An island placed wrong breaks your workflow. I mentioned this earlier but it bears repeating because it’s so common. The worst version is an island that sits between the fridge and the stove, forcing you to walk around it for every ingredient retrieval.
Before you commit to an island position, trace your typical cooking path. Fridge to sink to stove. How many steps does each leg take? If the island adds more than a step or two to any leg, move it.
No Seating Overhang Support
A counter overhang for stools looks great in photos. What you don’t see is the structure holding it up. Any overhang past 12 inches needs support — corbels, steel brackets, or a hidden support system. Without it, that granite or quartz overhang will crack or sag over time.
Corbels are the simplest solution. They’re visible, which some people don’t love, but they work. Hidden steel brackets cost more but keep the look clean. Either way, plan for this before the countertop goes in. Retrofitting support is a headache.
Wrong Height for Stools
This one sounds minor until you live with it. A standard 36-inch counter height needs 24-inch stools. A 42-inch bar height needs 30-inch stools. Mix these up and you’re either eating with your chin on the counter or your knees hitting the underside.
I prefer counter-height islands (36 inches) over bar-height (42 inches) for most households. Counter height works better for food prep, and 24-inch stools are easier to find and cheaper than 30-inch bar stools. Bar height does create more visual separation from the living area, which some people want in open-concept homes.
The other height to consider: if anyone in your household uses a wheelchair or has mobility limits, a lower section (30 to 34 inches) at one end of the island can make the kitchen usable for everyone.
No Electrical at the Island
Current electrical code requires at least one outlet on any kitchen island. Most kitchen designers put in more — one on each end, or a pop-up outlet in the counter surface. You want enough power for a stand mixer, a laptop, a phone charger, whatever your household actually plugs in.
The problem arises when people plan the island after the floor is finished. Running a new electrical line through concrete slab or finished hardwood is expensive and disruptive. Plan your island electrical when you’re still in the rough-in phase. It’s hundreds of dollars now versus thousands later.
Pop-up outlets are a good solution if you don’t want outlets visible on the sides. They sit flush with the counter and pop up when you need them. They’re not cheap — $150 to $300 each — but they keep the island looking clean.
Decision Matrix: Kitchen Size + Style → Recommended Layout
Here’s a quick-reference table to help match your situation to the right island approach. These are guidelines, not commandments. Your specific room shape matters as much as the square footage.
| Kitchen Size | Layout Style | Recommended Island Type | Why It Works |
|---|---|---|---|
| Under 120 sq ft | Galley or small L-shape | Rolling cart or no island | Preserves aisle width; cart moves when you need floor space |
| 120–150 sq ft | L-shape | Narrow island (24–30” wide) | Adds prep space without blocking main walkway |
| 150–200 sq ft | L-shape or open-concept | Standard island with seating | Enough room for clearance + stools; triangle stays intact |
| 200–250 sq ft | L-shape or U-shape | Large island with sink or cooktop | Space for full island function; two cooks can work together |
| 250–300 sq ft | Open-concept or U-shape | Oversized island or island + table | Island defines zones in a big room; seating for 4+ |
| 300+ sq ft | Open-concept | Double island | Separate prep and social zones; matches scale of large room |
Use this table as a starting point, then adjust for your actual room. A long, skinny 180-square-foot kitchen needs a different island than a square 180-square-foot kitchen. If you want a structured plan before you talk to contractors, grab our kitchen remodel checklist and walk through every decision in order.